Whether this is your address, phone number, website, or social media accounts, having that information be added automatically to your composed messages can be very helpful. But you may find that you no longer need that signature. Or, perhaps, it includes old or irrelevant information and you don’t want people using that information by mistake. Luckily you can remove a signature from Gmail in a manner similar to how it was originally added in the first place. Plus you can do this without actually deleting the signature information in case this is only a temporary measure and you intend to use the signature again in the future. The steps in this article are going to show you how to remove a signature from your Gmail account.
How to Remove an Existing Signature from Gmail (Guide with Pictures)
The steps in this article were performed in the desktop version of the Google Chrome Web browser but will also work in other desktop Web browsers, such as Mozilla Firefox, Apple’s Safari, or Microsoft Edge, as well. This removes your Gmail signature if it was added directly to your Gmail account. If the signature is being added by a third-party application, such as Microsoft Outlook or your phone’s Mail app, then you will need to remove the signature from that location instead.
Step 1: Sign in to your Gmail account and navigate to your Gmail inbox.
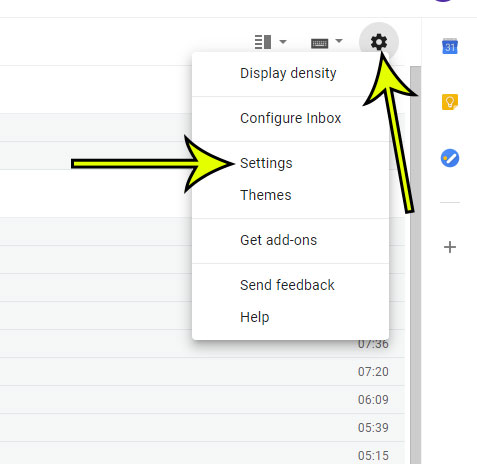
Step 2: Click the gear icon at the top-right corner of the window, then click the Settings button.
In newer versions of Gmail this now says “See All Settings” instead.
Step 3: Scroll down to the Signature section of the menu, then choose the No signature option from each of the drop down menus.
Note that you can delete the existing signature if you would like, but you can also leave it there if you want to use it again later. You can also elect to remove the signature for replies and forwards and new messages, or for just one of those options.
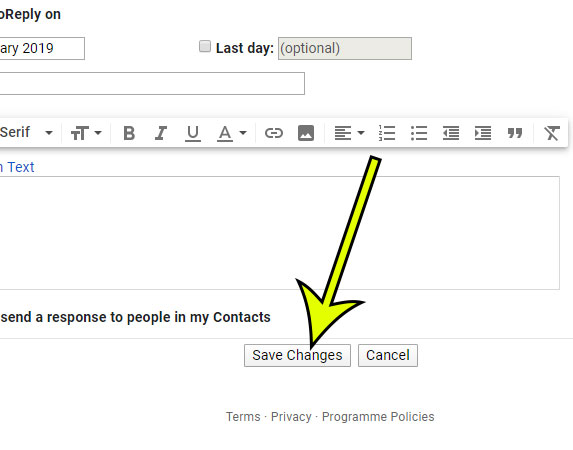
Step 4: Scroll to the bottom of the menu and click the Save Changes button.
After you click Save Changes all of these signature options will be saved Note that if you do not see a signature in Step 3 above, then any signature that is being added to your emails is being done so by another application. This is common when sending emails from your smartphone or with programs like Microsoft Outlook. You can read here to learn how to remove an email signature on an iPhone, or you can read here to learn how to remove a signature in Outlook.
Why Would I Want to Use an Email Signature?
If you’ve never used a signature in Gmail or another mail application, then you may be wondering why the Gmail settings include so many different options for signature settings. If a lot of the emails that you write are going to customers, clients, or people that may need to find other ways to contact you, then a signature can be really useful. It allows you to include things like a phone number, address, Web page, or social media link at the end of every email you write, and it occurs automatically. Additionally, it also looks professional when done correctly.
More Information on How to Remove Signature from Gmail
It’s very possible that you may have more than one Gmail account. It’s a popular email service for a lot of schools and workplaces. Removing the signature from your account with the steps above will only do so for the account to which you are currently signed in. You will need to sign into any other Gmail accounts and repeat these steps to remove the signatures from there, too. If you decide later that you do want to use a signature, or if you’ve never had one before and would like to create a signature, then it’s a similar process. Simply click the gear icon, select See all settings, then scroll down and click the Create New button next to the signature section. After you give the signature a name you will be in the signature editing window where you can add the information you want to include for your signatures. At the right of the signature name is a field where you can enter the signature information. Below it are options to format the signature with a different font, text color, or other styling. You can even choose to add a link to a Web page or an image. Finally, at the bottom of the signature section, you can choose which signature to use for new messages or for replies and forwards. You can also choose to insert your signature before quoted replies. If you are exploring the Gmail settings menu and are having trouble getting back to the signature, click the General tab at the top of the window. This is the tab that is open by default when you sign into the Settings menu. These steps will be a little different if you are using the Gmail mobile app. Once you have downloaded the mobile app and signed in with your Gmail account you can: If you are using the default Mail app on your iPhone or iPad, then any email that you send from there will not use either the mobile signature or the desktop signature. You would need to go to Settings > Mail Accounts > and set up the signature there.
Additional Reading
He specializes in writing content about iPhones, Android devices, Microsoft Office, and many other popular applications and devices. Read his full bio here.