Many people don’t know where their documents are saved by default, and struggle to find them when necessary. Fortunately, you can find out how to change the default save location in Word 2010 and make it much easier to locate the documents you edit.
How to Switch Where MS Word Saves Documents
Our guide continues below with additional information on how to change the default save location in Word 2010, including pictures of these steps. The Windows operating system is pretty easy to use when it comes to saving and copying files, but it does have some ideas about where it would like you to save things. Ideally, anything you download is going to wind up in your Downloads folder, imported pictures will go to the Pictures folder, and new documents will go to the Documents folder. This makes it pretty easy to find files when you are looking for them. But a lot of people either have their own way of organizing their files, or they don’t like the options that Windows implements by default. So if you want to change the default Save As location in Microsoft Word 2010, you just need to change a setting in the Word 2010 Options window. If you’ve ever needed to switch between inches and centimeters in Microsoft Word, then our guide on 1 inch margins in CM will show you an interesting setting that you can adjust.
How to Set a Default Save Location in Word 2010 (Guide with Pictures)
A lot of people might not even realize that this is an option, and just continue to navigate to their preferred save location every time they create a new document in Word 2010. But, by making this adjustment you are going to save yourself a few seconds with every document, while also ensuring that you don’t accidentally save a document to a folder where you might not think to look for it. So continue below and follow the steps to change the Word 2010 save location.
Step 1: Launch Microsoft Word 2010.
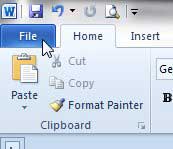
Step 2: Click the File tab at the top-left corner of the window.
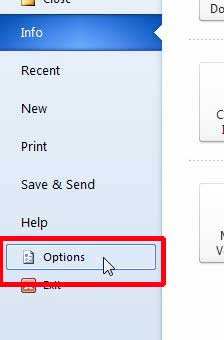
Step 3: Click Options in the column at the left side of the window.
This is going to open a new Word Options window.
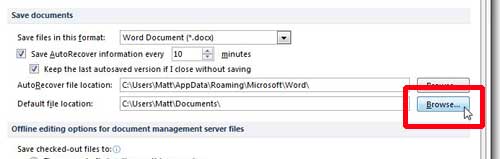
Step 4: Click the Save option in the left column of the Word Options window.
Step 4: Click the Browse button to the right of Default file location.
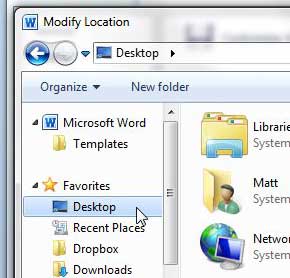
Step 5: Select the location to where you want to save your documents, then click the OK button.
For example, in the image below I am choosing my Desktop as the default location. Now, whenever you save a new file, it will open to the location that you just specified. If you ever need to change this again, simply follow our steps again on how to change the default save location in Word 2010. We have previously written about using SkyDrive as the default save location for Word 2010, which is a good option if you use multiple computers, or simply if you want to create a backup solution for your documents. There’s a newer version of Microsoft Word available, and you can get it as a subscription now. You can also use just one subscription to install Word and other Office programs on up to five computers, that can be any combination of Mac and Windows computers.
Additional Sources
After receiving his Bachelor’s and Master’s degrees in Computer Science he spent several years working in IT management for small businesses. However, he now works full time writing content online and creating websites. His main writing topics include iPhones, Microsoft Office, Google Apps, Android, and Photoshop, but he has also written about many other tech topics as well. Read his full bio here.
You may opt out at any time. Read our Privacy Policy